Friday 29 June 2012

ROCK ANGELS


Morning all, and its Friday hurrah and pouring with rain, so a great day for scrapping!
Here is another A4 Layout I have done for my daughters school Album.
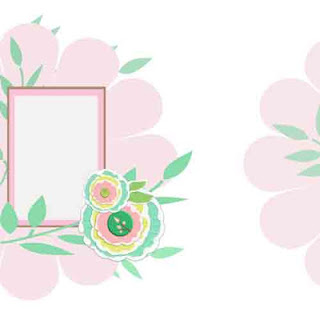
I used a sketch from STUCK which I turned on its side - see below.
A very quick and easy page for you - just choose your colours and papers and layer up as per the sketch.
Add a few flowers and a butterfly and you are done. This took no time at all, so if you prefer quicker layouts then  this one is for you. BFN

Thursday 28 June 2012

MILLIE


Good morning scrappers - hope you are all well. Here is a layout I have done using a sketch from The Flying Unicorn. I loved this sketch as it is very flowery and easy to follow.
I have been meaning to do a Millie page for ages, so here it is.
 This is what I did.
I chose my papers first, these are from Little Sprout by Fancy Pants Designs from SJ Crafts and some pink Bazzill.
First of all I chose the background card then picked a pretty pink paper for the shaped layer. I used a template to draw round. Then  I made my layers and matted my photo.
I used a Martha Stewart Doily punch for the cream cardstock and stuck everything down.
Then comes the best bit, making the flowers and decorating the page. I used my Tim Holtz die for the large flowers, and misted them with some home made spritz, I'll do a tutorial later for how to make it. Then I die cut a butterfly and spritzed that, added a dragonfly and other flowers and pearls. I hand cut the cherry blossom border from some Websters pages paper and added some perfect pearls for the stamens. I added the journaling using a Prima journaling notecard (Melody range)  and cut out the title. Have a great day. BFN
This page took about an hour and a half. 

find sketch herehttp://flyingunicornforums.com/forum/topic/1179

Monday 25 June 2012

FESTIVAL FUN


Morning all and happy Monday.
Here is a layout I finished on Saturday for a challenge over at the Flying Unicorn - its for the blue green and yellow summer challenge. (see link below).
Here for a change I have done an A4 Layout as it is for my daughters school album which is A4.
This is the Bournemouth Sevens Festival the girls went to.
So,  first I chose my papers and then matted the picture onto some green bazzill. I triple matted this one with yellow and then some pretty Prima green paper. I cut out a scalloped background using a temple, then added a few borders and stickers and some rik rak ribbon.  I added one of my flower vines and some flowers and a butterfly. I die cut the title using a sizzixx sizzlets die. I added some journalling, and thats it - easy peasy and very quick. Thats all for now - BFN

http://flyingunicornforums.com/forum/topic/1125

Saturday 23 June 2012

SWINGING 60


Hi hope you are having a great week end.
Here is a page I have been waiting to do for ages. Its the other side to a double layout I did ages ago. I tried to use the same or similar papers.  I used the Mojo Monday sketch from The Flying Unicorn for my inspiration. I loved this sketch, I turned it on its side and did lots of layering. Great fun. This took about an hour so a  nice quick sketch if you want to give it a go.
 First of all, choose all your papers, then matt up your photo. I then stitched all around my backing card on my machine. I added the hand cut black circle (using my large scalloped scissors), then added the doily. I added my matted photo then started to layer up as per the sketch. I added flowers and butterflies and the title. I love pink and yellow together. Why not give it a go.

Friday 22 June 2012

BECAUSE YOU'RE WORTH IT

Happy Friday everyone.
Here is a layout I have done using a sketch from My Creative sketches for my inspiration. (See sketch below).
This is the other page to my double page spread, so I have used the same papers and colours.
My background paper you can just see, is from Prima, melody range. I used a ready cut scalloped black cardstock.  I used a doily.  I cut a pink bazzill cardstock circle to go over the top.I matted my two photos in the pink cardstock. I double matted the small photo with some prima black script paper. I adhered all this and started to distress my border peices. I cut three for the side and three for the bottom. I adhered these then started to decorate. The birdcage is cut from the prima paper and I added one of my stick pins to the top. I added some wire pearls,  flowers, a pink prima butterfly and a hand cut one. I die cut some swirls(Tim Holtz) and then added the title using some Websters Pages alphabet stickers. (I love their alphas).
Hope you like it.

http://mycreativesketches.blogspot.co.uk/2012/06/junes-sketch.html

Thursday 21 June 2012

HAPPY BIRTHDAY CARD

One super easy Birthday card. Made with the leftovers from my last layout. I made a paper rosette flower, added pearls, a butterfly, and a doily, some tiny flowers and thats it.

Wednesday 20 June 2012

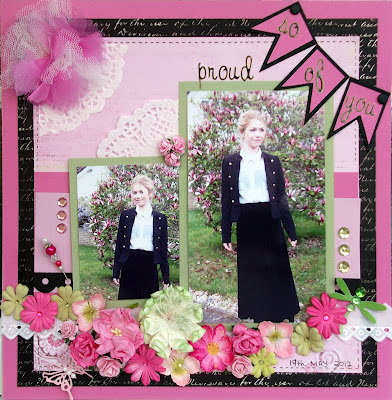
SO PROUD OF YOU


Good morning this sunny Wednesday. Here is a layout using Sketchabilities Sketch No. 73 for my inspiration. Jessie is stood in front of our magnolia tree and I wanted to capture it before the blooms all disapeared, they do not last for long. Also I wanted to capture this day, as Jess brought home the most brilliant report card from school, so we celebrated by going out for dinner.

Here is what I did;
I used some Bazzill  dark pink, light pink and green cardstock and some Prima script paper.
I cut an inch off the black prima card stock and adhered this onto the dark pink card.
I cut 2 inches off the pale pink card and using a black pen added faux stitching all around the edges.
I added some border pieces of card as per the sketch and matted my photos, then glued all this down.
I then made the banner just by hand cutting out and adhered this with two black brads.
I then added a lace border and started to decorate with matching flowers. I added a butterfly and dragonfly and one of my hand made stick pins. I added the doilys and made the large pink flower with some chiffon and netting fabric. (And my tim holtz tattered floral die). I added the gems and there you have it. The title is from Websters alphabets. (The fabrics came from a small pack from poundland!)  See sketch below. BFN

http://sketchabilities.blogspot.co.uk/

Tuesday 19 June 2012

BEST OF BRITISH


Morning all - here is the other page to my double layout on our Jubilee Street party.
For this one I wanted to keep it similar to the other page but not quite the same.
Ive used the same colours and some flags and tags for the Flags and Tags Challenge over at the Flying Unicorn. See here -  http://flyingunicornforums.com/forum/topic/1122
Ive also added some paper rosette flowers from a Tim Holtz die. The scalloped tags are from Sizzix.

Monday 18 June 2012

SWEET FRIEND


Good morning scrappers and Happy Monday. Here is a card I have made from the leftovers from my last layout. I used the Prima paper and the tan cardstock, cut  out a scalloped border and added some pearls and flowers. I added some white stitching with a white gel pen and added a small tag with a ribbon. Hope you like it - have a great day.BFN

Friday 15 June 2012

FUNNY GIRL

Morning all and thank goodness its nearly the week end.
Here is a page I have just finished, using a sketch from Creative Scrappers for my inspiration.
Also I am entering this into a challenge at the Flying Unicorn.
The challenge is to scrap  a layout using a rolled paper technique, one other technique and layers.
My extra technique is cutting out or fussy cutting. The border is hand cut from the Prima paper.
So, first I chose my cardstock and pretty paper, I was happy to include pink!  Then I cut  half an inch off my tan cardstock and distressed the edges, wet the edges with water and rolled them in. I cut about 2 inches off the pretty paper and did the same. Then I matted my photos from the pink cardstock that I removed  from the centre (gutted) of the backing card. I layed these down as per the sketch and then cut out my border. I then decorated with some mini roses and a pink carnation. I added a small hidden journaling block and one of my stickpins. The title is from some Websters stickers and so are the two mini borders at the bottom. Why not give it a go, this one didnt take long at all, about an hour. Have fun and happy scrapping. BFN

Sketch 212 - Creative Scrappers
http://creativescrappers.blogspot.co.uk/2012/06/sketch-212.html
For the Flying Unicorn challenge see here----
                                                                      Rolled edges challenge

Thursday 14 June 2012

On your special day

Good morning all. Here is a card I have made using all the leftovers from my last layout. As a personal challenge, I thought I would try and make a card every time I made a layout so that I could use up all my bits n peices. Also, I would then always have a card when I needed one. And I wouldnt have so many little peices of paper left around that I didnt know what to do with, that Ididnt want to throw away.
Have a great day. BFN

Wednesday 13 June 2012

MEMORIES

Morning all, here is a layout I have just finished using a sketch from STUCK ON YOU SKETCHES.
(I have reversed it)
First of all I chose my papers and colours, grey black and yellow, (theres a tiny bit of yellow in the photo), and I love black and yellow anyway. I then matted my photos. I cut out three black circles with my squiggly scissors and added some patterned paper circles. I hand cut the banners for the sun, there is a circle under there somewhere. I used a white pen to draw in some stitching on the banners to define them a little more.
I adhered all this, then cut out the border peices and stuck these down. I added three stickers, one with the date, a large title and a small title. Then I added the flowers and butterflies.I put in one of my flower vines and one of my  black and pearl stick pins in the left corner with a little black bow on. The paper is from Basic Grey. (Little Black Dress Collection).  See sketch below. Have a great day. BFN

I have also entered this into a challenge over at SJCrafts for their monthly challenge No. 5 to use something old on an All About The Boy layout. (This is my hubby with his brother).  I have used some really old newspaper print paper that I have had since I first started scrapping about 7 years ago!!!!   
See here  Monthly challenge


http://stuckonusketches.blogspot.co.uk/

Tuesday 12 June 2012

HAND MADE STICK PINS


My Pink stick pins


My Purple stick pins


My freestyle stickpins
  
Good morning everyone, I thought you might like to see the stickpins I made for a stick pin swap over at the Flying Unicorn.
They are very easy to make and quite addictive. Once I started making them I couldnt stop, so now I have a whole pin cushion full!
I will use them on my layouts and on cards that I make.
The supplies you need are-
1. A long hat pin, you can buy these in the wedding supply area of Hobby Craft.
   Two or three inches long is  best. (Mine had a small pearl at the head, but you can also get diamonte ones.
2. Glass pearls, glass beads, spacer beads and bead caps.
3. Glossy accents to glue them all together.

Heres how -
Take your stick pin and add a tiny drop of glue under the pearl head and thread on a small bead cap.
Add a drop of glue into the cap then thread on a large bead.
Add a drop of glue at the base of the bead and add another bead cap or spacer bead.
Add a drop of glue at the base of the spacer bead and thread on another bead.
Try to add a bead then a spacer bead so that the glass beads do not rub against each other.
Keep going like this until you are happy with the result and then add a tiny drop of glue at the base of the last bead. Leave to dry. I found that with using the glossy accents there is no way these will fall apart, I could not prize any beads off at all.
I made tags to display and mail them by using some Prima journaling cards, adding a few layers of sticky back foam, and decorating the front, then I stuck the pin into the foam, so there is  no chance of sticking yourself.

Have fun, and remember, this is highly addictive so proceed with caution!!
( I bought all my supplies on ebay).
Have a great day everyone. BFN

Monday 11 June 2012

Keep Calm and Carry On


Morning all, here is a layout I have done for a challenge over at the flying unicorn. Its for flags and tags.
I thought our street party would be great for this - so here it is.
For this one I downloaded some free templates for the flags and cut out the peices I wanted.
I used  red blue and white of course, and started off with some Basic Grey, grey cardstock.
It really was a grey dreary day, we were freezing cold and we got rained off, so I thought this was appropriate. Then I started to matt and layer up my cardstock. I made the bunting and flags and added the title and the butterflies. Hope you like it.    see the flags and tags challenge here. I didnt use a sketch this time.

Saturday 9 June 2012

BACK TO SCHOOL


Hurrah its the weekend! Hope you are having a good one.
Here is a layout for the flying unicorn Mojo Monday Sketch Challenge.
This didnt take as long as it looks, about 2 hours if that.
I chose the blue and white and tan from the photo, and started with the blue backing card.
Then I added white scalloped cardstock then some Basic Grey patterned paper. I then started to layer up, by first matting my photo then using a Martha Stewart punch for the punch around the page paper. I adhered this to some white cardstock as the scallops didnt show up. I cut some borders in patterned paper and blue and tan, then glued everything down and started to decorate. I used a Prima journaling box for the journaling and then added flowers and diecut swirls and branches. I added two cut out butterflies and a die cut title. the swirls are tim holtz. Thats all for now. BFN

flying unicorn mojo monday sketch
http://flyingunicornforums.com/forum/topic/1139

Friday 8 June 2012

KEYS TO MY HEART


 Thank goodness its Friday everyone and Welcome.
 Here is a layout I have just finished for a chipboard challenge over at the flying unicorn forum here .http://flyingunicornforums.com/forum/topic/1123
I also used a sketch from Once Upon A Sketch. (see below).
I wanted to put as much chipboard on this layout as possible!!
So here is what I did. First I chose the papers, they are a mixture of Bo Bunny, Prima and Basic Grey!
Then I layered them up, as per the sketch (after first using my squiggly scissors to cut out and then I inked the edges). Then I made my chipboard peices from 1mm chipboard and Tim Holtz dies. I then painted with ranger white crackle paint and inked all over with brown ink. Then I used my Glossy Accents to the key and lock and arm thingy ( not sure what you call that).  I glued paper onto the chandelier chippy and added pearls. I added the title to the gate chippy at the bottom, and glued on another key. I made the largest flower with my tattered floral die and added some stamens, then added more flowers. I added two Prima butterflies and a Prima journaling block for some secret journaling. I added some pearly stems to the floral group. Now Im thinking that the extra key is a bit much but thought it went with the title. What do you think?

Once Upon A Sketch
http://onceuponasketchblog.blogspot.co.uk/

Wednesday 6 June 2012

KENT

Good morning scrappers - hope you all had a great Jubilee weekend, ( I didnt get any scrapping done as I was glued to the festivites on the television, plus we had a street party).
I finished this on Saturday and for this layout I used a sketch from Sketchabilities.
The papers are from Basic Grey.
So, first I chose my colours from the photo, then matted the photos. Then I started to choose the papers for the different layers as per the sketch. I cut two large circles out (I drew around a plate) and matted one on top of the other.  I cut 2 small circles out and did the same. I cut out 2 large rectangles and matted them, then I started to glue these down. I then added my matted photos.
I made some borders, one using my large scalloped scissors, just love those scissors, and used a die for the banners. I lay down my borders, added some ribbon, die cut a couple of hearts, then found some matching flowers. The grey one is from Basic Grey and I made the white one from some lace. The centre is from Basic Grey as well. I added in some mini roses and some pearls, die cut the title and there you have it. Another quick layout - why not give it a go.  The sketch is below.


Sketchabilities
                                                                       sketch No. 72

Saturday 2 June 2012

SUGAR AND SPICE


Morning everyone, hope you are all ready for the big Jubilee week end.
Here is my latest layout using a sketch from the flying unicorn.
For this one I chose coral and aqua  from the photo with some brown thrown in.
First of all I chose the background patterned paper, I think its Prima, and the main backing cardstock.
Then I matted my photo and sorted out all the papers I wanted to use. Then I lay down my doily and started to cut out 2 patterned circles and 2 ovals. I used scalloped scissors for the polka dot paper and then I inked up all the edges. I stuck these down, cut a brown scalloped border useing extra large scalloped scissors.
I then started to decorate with flowers and butterflies (Prima). I hand made the lacy white flower, hand made the stick pin and cut a swirl and a branch from die cuts. I die cut the title and thats it. It didnt take too long, the only tricky bit was cutting out the ovals, for which I traced around a dish! Have a great week end.

Flying Unicorn Mojo Monday Sketch
http://flyingunicornforums.com/forum/topic/1111

Friday 1 June 2012

THE COURTYARD


Morning all - here is a layout I have just finished for a sketch challenge over at SOUS. Sketch is below.
For this one I chose green from the floor surface and yellow from the photo and I just followed along with the sketch. If you want a quick page then this is the one for you. It took about an hour. So my background paper is from Prima, then I cut down some green bazzill to 10 x 10 inches and adhered that. I added my doilies and matted the photo in the green Prima that I gutted from the backing peice. I then added my flowers and vines and dragonflies and a Prima butterfly. The title box is also Prima.

To make the vine.
You will need -
 green or brown floral tape
florist wire
florist twine
leaves on stems
small flowers on stems
So I started at the top and worked down adding a little at a time and twisting the tape as I went.


http://stuckonusketches.blogspot.co.uk/